So, it’s been a while since I’ve done web-development. And I really did want to write my own website, but I never really found the time for it — school and all that. But now, being in-between schools has allowed me to look at an old design, and I’ve been polishing the code a bit, and the site is now live — not done, but live. This means that I will be moving my blogging over to the new site, which can be found at http://www.casperbhansen.dk/.

Be aware, that I am currently working work on finishing up the basic functionality of the site as I write this blog post. For the time being blog posts will be static. This means you will not be able to comment, like, or anything of the sort. I do hope to implement a nice blogging system sometime in the future –maybe over the coming months–, but for now static blogging will have to do. Should you feel compelled to reply on a blog post I’d encourage you to follow me on Twitter (@CasperBHansen) and leave your comment there.

I’d like to add, that WordPress.com has been great. But as a programmer, I love creating my own stuff, and now that I have the time to make it happen, I will.

See you on there!

Spam: Fighting Back!

Posted: August 3, 2011 in Tips & Tricks
Tags: , , , , , , ,

Before you read on, this how-to post is specific to the Mac OS X mail client (Mail), but should be just as easy to set up in other mail clients that support custom mail filtering.

You probably hate spam mails just as much as I do, so share with you what you can do to fight back and hopefully make the spammer blacklist your e-mail from their “service”. Keep in mind, while reading this, the process of retrieving information about the owner is not necessary if you already know the individual or company’s e-mail address — which is ultimately what we’re looking for. Spam services often mask their identity, or make it hard to find any contact details about them (and you can’t reply to spam-mail), which is why we need to go find them ourselves. For the sake of demonstration I’ll be trying to find my e-mail knowing only a domain.

Firstly, identify the owner of the domain from which the spam is coming from. This can be done via whois services, for example http://www.whois.net/. For example, if you were to look up my domain at http://www.casperbhansen.dk/ you’d be presented with these informations about the owner  (in this case me);

[Querying whois.dk-hostmaster.dk]
[whois.dk-hostmaster.dk]
# Hello 131.103.218.176. Your session has been logged.
#
# Copyright (c) 2002 - 2011 by DK Hostmaster A/S
#
# The data in the DK Whois database is provided by DK Hostmaster A/S
# for information purposes only, and to assist persons in obtaining
# information about or related to a domain name registration record.
# We do not guarantee its accuracy. We will reserve the right to remove
# access for entities abusing the data, without notice.
#
# Any use of this material to target advertising or similar activities
# are explicitly forbidden and will be prosecuted. DK Hostmaster A/S
# requests to be notified of any such activities or suspicions thereof.

Domain:               casperbhansen.dk
DNS:                  casperbhansen.dk
Registered:           2009-05-01
Expires:              2012-05-31
Registration period:  1 year
VID:                  no
Status:               Active

Nameservers
Hostname:             ns1.dnsplus.dk
Hostname:             ns2.dnsplus.dk
Hostname:             ns3.hosting2.dk

# Use option --show-handles to get handle information.
# Whois HELP for more help.

From this information, you can see that my site is hosted by a company called ‘DK Hostmaster’, so now we’ll go to the hosting company’s site and see if we can get some contact information on their client (me) — now this site is in Danish by default, but there is an English version available if you want to follow along with me in the process of retrieving the necessary information.

On the main page, we can search for available .dk domains in the box with the title ‘Find .dk domænenavn’ (or in English ‘Find .dk domain name’) — so we’ll search for ‘casperbhansen.dk’, and voila!

The return result has several informations about the owner (me) and how to contact me. From here on out, you can decide how you want to combat the problem; you could try calling them by phone and talk them into blacklisting your e-mail from their service, you could do the same by visiting the address, or as I do, find an e-mail associated with that individual/company responsible and let them taste their own medicine.

So, armed with a name/company, telephone number and address, finding an e-mail address should be easy, especially since most spam-services would be associated with a company. There are several ways of doing this; try searching for the company name, and an e-mail address should be easy to find on their website, or searching for a company associated with the telephone number or address should be just as easy.

Well then, now that we have an e-mail address, let’s perform our counter-attack!

  1. Open up Mail and under the ‘Junk Mail’ pane in the preferences window and make sure that ‘Filter junk mail before applying my rules’ is unchecked.
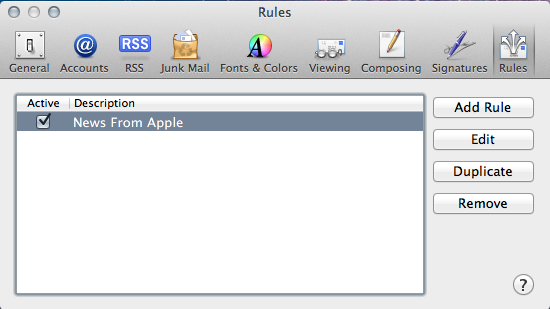
  2. Afterward, go to the ‘Rules’ pane in the preferences window.
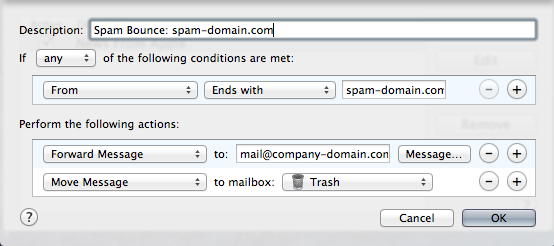
  3. Click the ‘Add Rule’ button and set up the rule as shown below, where ‘spam-domain.com’ corresponds to the domain from which you are receiving spam, and the ‘mail@company-domain.com’ corresponds to the contact e-mail address you found at the company’s site.
  4. Click the ‘Message…’ button to add a message to the spammer if you want, maybe something along the lines of ‘I believe this belongs to you.’
  5. Click ‘OK’ and you’re good to go!
From now on, mail sent to you from the spam domain will bounce (get forwarded) to the company’s contact e-mail address — which will probably annoy them quite a bit. Oh, and any mails received from that domain will never appear in your inbox ever again, as it is automatically trashed.
I hope you enjoyed this article and make good use of it — let’s show these bastards that we’re not that easily fucked with, have fun!

So, there’s this service we have in Denmark called NemID (English translated: EasyID), and for some reason, probably of lack of knowledge about how the Mac platform’s log files are organized, they’ve decided to put a log file in our user directory – URH! wrong place.

This has been bothering me quite a bit, and for quite a while now. Since I don’t think they’re going to fix the issue anytime soon, I thought why not apply a temporary fix and share how to do this with all of you who might have, if not the same, maybe similar problem.

Be gone, danid.log!
Getting rid of unwanted log-files is actually quite easy on the Mac, all we need to do is to set up a folder action from within Automator that will move a file to the trash should it be the nagging log file we want to get rid of.

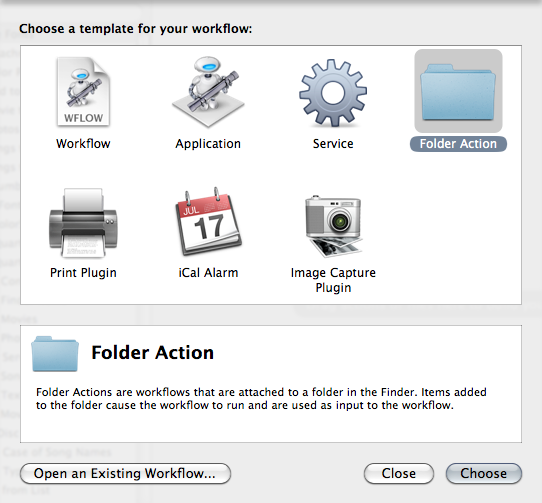
1. Fire up Automator and choose the Folder Action from the template listings.

2. Choose the folder in which the unwanted file appears.

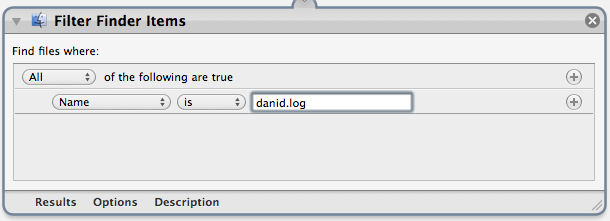
3. Search for the ‘Filter Finder Items’ action and add it – fill out the options as necessary to zero in on the unwanted file, in my case the file is called ‘danid.log’.

4. Search for the ‘Move Finder Items to Trash’ action and it below the previous action.

5. You’re done, save the folder action.


Be sure to make a test file, a dummy-replica of the unwanted file, and try to put it into the folder.

A full trash can and the file going missing once you drop the test file into the folder indicates a correctly programmed folder action.

By sheer accident, I discovered the Mac App Store supports searching based on the file format you are looking to work with — Mac OS X will even ask you if you want to search the store for an application capable of reading a file, should it not have one installed already.

Search terms
I’m not quite sure whether or not there are more ways of search the content on the Mac App Store, if there is I will update the following list accordingly – please do comment below if you are aware of more ways to search.

  • extension:argument — searches for any application that is able to read/write files of type specified in the argument (ie. ‘extension:nib’)

note: if you haven’t watched the Zeitgeist documentaries or aren’t aware of the conundrums it addresses, you should watch at least ‘Zeitgeist Addendum‘ before reading on.

Ideas, suggestions and opinions presented in this article aren’t necessarily the views of the Zeitgeist movement. The article isn’t meant to attack anyone, nor does it mean to offend anyone. It simply reflects the thoughts of the author, as to how a resource-based economy could be introduced — inevitably, this does require some strategic action, that could be understood as conspiracy or the likes, which it is not.

As an avid member of the Zeitgeist movement, I have been pondering possible solutions. What would make an ideal first step toward a resource-based economy (RBE)? I’ll put forth some suggestions, but no definite solution, and I’d love to hear your opinion and suggestions as well.

We are all dependent on the established monetary system, so we cannot simply deny participating in it. It seems almost impossible to fight a system which you are a part of and dependent on. You can of course raise your hand and state your case, but the only ones that can actually make changes to the system doesn’t feel the effects of its flaws, so they have no reason to do so — some may even see it as absurd and will disregard the issue, simply because they already have what they need.

Are we just going to give up then?
Certainly not, we just need to devise an approach which introduces the concept to people unaware of the issue it attempts to resolve, in such a way that it appeals to them. It would be a long hard road, if we are to convince all governments, companies, etc. that we need to make a move into resource-based economy — I’m sure the banks and wealthy people would object to this. So let’s focus on a more strategic method. As a programmer, I like solving problems, it’s pretty much what programming is all about. Programmers design and build systems from the ground up, but some also do the opposite of that — hacking. Hackers take systems apart, learn how it works and make it do things it isn’t supposed to do. What I am getting at is that a hacker’s approach would be the most efficient way of tackling the problem — break the system where it is most vulnerable and exploit it.

Alright, so how do we do that?
Let’s say we were to analyze the monetary-system, and we are looking for vulnerabilities. We need to make sure of a few things when choosing the vulnerability and exploit;

  1. Nobody should suffer financially from the ‘attack’ — you cannot change the system suddenly like that.

Taking these things into account, we look at the most vulnerable part of the monetary-system, the consumption cycle. This is the three-part wheel that makes the whole system work; the consumer, employee and employer. We know that we cannot have one of these fail completely, but we can weaken its life-blood, money. Money and resources are exchanged in this cycle, and if money were to be slowly phased out of the equation, you’d be left with resource exchange only — this is the ultimate goal, right? Right. What we need now is, citing The Godfather; “an offer you can’t refuse”.

Employers will be the tool of the exploit and the consumer will be the target. The concept needs to be derived from something they are familiar and comfortable with, and that presents a good deal for any person looking to acquire something. This is very familiar ground for most consumers; whether you are buying groceries in the mall or looking to buy a laptop computer, you are looking for the best deal available.

We have the best deal, for anyone — ever!
Since the consumer is always looking for the best deal, supporters of a move toward a resource-based economy would be able to take advantage of the system in a way that not only cripples it, but also exposes how irrelevant money really is — thus if followed through, not only introduces the idea to the public, but proves its function and allow for comparison with the monetary-system. The general purpose of this is to gain trust in the proposed RBE-system by way of example, and make it difficult for monetary-based companies to compete.

The following would require a group of creative individuals, developers, and the likes — people who enjoy creating something out of nothing, not needing to charge money for what they do. Just to clarify, I would volunteer to this group myself. This group will “sell” its products with a set conditions, which allows for both systems to operate on, but promotes the RBE-system. Of course, the exact declaration and definition these conditions would have to be discussed among those who are in favor of taking action on this approach, but this is a rough outline of what I’m thinking it could sound like;

Products are given free of charge if;

  1. You are RBE-supporting company — this means you offer some or all of your product resources with this same license.
  2. You need it for any reason other than commercial (eg. study, research, etc.) — this means you do not seek monetary gain from usage of this product.

Should you not meet any of the above, you are subject to pay for the service or product. — Any payments under this license goes mainly to sustain the product and its vendor as long as the monetary-system is in effect and to help RBE develop further.

What good does this do?
Marketing with this ‘licence’ would effectively pull money out of the supply from those who seek monetary  gain from their products, and makes the RBE model compete directly with the monetary-system. Granted, the idea is a bit sketchy at this point, and a whole concept on this idea would be a very long article, so has of course been made quite a bit simpler.

Your move!
If you are like me, creating stuff all the time anyway, why not jump in and let’s have a go at it? Although I am studying at this time, and may not have a whole lot of time to develop products, I do want to see any idea through if the community agrees that it could yield results. Have your say, I leave the word up to you!

Read the rest of this entry »

Well, it’s about time I did a post on music production, I have been wanting to do this for quite a while. In this quick tip, I will show you how to wire up a crisp stereo effect, which works great as both send and insert. I recommend having this effect hooked up to the 4th auxiliary channel (for pre-fader) of your main mixer, as you will probably find, it is a necessity once you hear the effect it has on your sounds — if you aren’t familiar with the terms send and insert, here is a great article about just that.

Any sound can benefit from this effect, be it a synth, a sample or another effect even, so make your pick and load it into Reason. I’m going to go with a SubTractor synth, just to show how this DSP technique can be used to a convert mono signal into stereo.

First off, cut all cables to your sound of choice. To prevent auto-routing, hold down the SHIFT key as you add a Spider Audio Merger & Splitter and a DDL-1 Digital Delay Line. Now, instead of meticulously going through each cable connection, I thought it best to just show it and explain how it works.

Example 1
From our output of our chosen device, we split the audio signal with the Spider Audio Merger & Splitter. We then take the first left split channel, and simply put it back into the left merging input of the Spider Audio Merger & Splitter. The next left split channel we put into the left input of the DDL-1 Digital Delay Line and route the right output of that back into the right merging input of the Spider Audio Merger & Splitter. That takes care of the routing.

Skip ahead to Setting Up The DDL-1 Digital Delay Line.

Setting Up The DDL-1 Digital Delay Line
With the routing done, all we need to do now, is to tweak a few knobs on the DDL-1 Digital Delay Line and we’re home free. Take a look at the example below, the settings shown apply to both insert and send.

Example 2
For this technique, most of these settings remain the same every time you use it. However, the delay controls how much spread the effect will have — I find the range 8 − 48 to be great, the shorter the sound though, the shorter you’ll want the delay to be, but this of course depends on the what effect you are trying to accomplish.

Notice that the delay is in milliseconds, not steps.

Hopefully you found this useful, thanks for stopping by.

UPDATE: The event will be streamed live by Apple on their website. A link has not been released yet, but this has been confirmed by italian Apple PR — we will probably see it on Apple’s site within an hour or two before the event begins. My educated guess, judging from the previous stream they provided and the archived event footage page links, is that it will probably get streamed from http://www.apple.com/apple-events/october-2010/.

I’m a little late on this one, but I’m gonna give my thoughts on it anyway! Last Wednesday Apple sent out invitations for an event, taglined it ‘Back to the Mac’ and it comes with a pretty picture with a lion peeking out from behind a cut-out of an Apple logo. Now, while the picture speaks for itself, some people have speculated that we’re going to see some hardware updates, I’m not entirely convinced of that just yet. I firmly believe that this event is focused on software, and software only. However, one could imagine they’d throw in a new MacBook Air for kicks, but I doubt it.

    My Expectations
  • A preview of Mac OS 10.7 — supposedly code-named ‘Lion’ by the looks of the invitation.

    The invitation banner isn’t very subtle on this, now is it. We’re talking big cats again, and my expectations are high for this major iteration of Mac OS X. I think this one will be focusing mainly on the graphical user interface, possibly borrowing a few concepts from the iOS platform, as suggested by others — I believe this will be the ‘wow-factor’ of the presentation, discarding the ‘Aqua’ interface with a more minimal look and unified user interface [insert some random code-name for it here]. Other than that, we can only imagine what Apple has decided to implement into the ‘Lion’, since the last iteration of Mac OS X was heavily focused on improving the very foundations of the system, this one will probably be very feature-rich. Lastly, with the support by Steam that we saw earlier this year, Apple really needs to see the opportunity in this and embrace it by making gaming on the Mac a major focus for them — possibly by writing a few helpful API’s for gaming specifically, or their very own OpenGL engine?

  • A preview of iLife ’11

    iLife is getting old. The last iteration done on it, was ’09 which definitely could use some love from Apple. I see more social network integration in it, a few ‘wow-features’ and probably a major overhaul of the entire suite, with the exclusion of some of the products it currently has, like iDVD. In terms of specific feature I won’t even try to guess at it, because knowing Apple I’m probably going to be wrong about most of it — they usually top anything I can think of. Wishful thinking would include a complete rework of iWeb that doesn’t just have the ‘push-a-button-to-make-a-website’, but the option to get more involved with the actual code.

We probably won’t see an immediate release of Mac OS X, however we might get a release date on it. I don’t think they’re going to wait until WWDC 2011 to release it, simply because Apple has so much to show off at WWDC now that iOS devices are becoming an increasing focus for Apple —which I don’t like one bit at all—, and showing a Mac OS X release usually takes the bulk part of a keynote presentation — but then again, that might be why Steve is going to show it to us now.

I think we’re in for a nice long presentation of Mac OS 10.7 Lion with ‘one more thing’, which is the iLife ’11 suite and the possibility of a new MacBook Air. The event takes place today at 10am Pacific Time.

Where to Start

Posted: September 17, 2010 in Development
Tags: , , ,

One of the most frequently asked questions I get from beginners in programming, is that of where to start. This is very common amongst beginners, that they are given the tools to do almost anything, but they lack the inspiration of what these tools can be used for. As with anything, practice makes perfect, and programming is no different, so anything you can think of is really good exercise.

Besides practicing the use of the tools you are given though, I recommend a gradual move into practicing techniques, rather than syntactical practice. I look at programming as problem-solving, and each time you solve a problem you learn a technique for a given task, with practice you learn more and more techniques — some even for the exact same problem, just more efficient than the last. So, I suggest setting yourself goals, modest goals to begin with, practice the goal until you have a thorough understanding of the problem and solution, even try different ways of accomplishing the same goal — this way you will not only have understood the problem, but also gain a deep knowledge of various techniques to solve it, which will come in handy later on.

From Beginner To Intermediate
These are a few suggestions for you to practice, that get increasingly difficult to solve. If you finish all, go back to the first project and try to solve it with any new technique learned as you progressed. And if you are learning an object oriented programming language, such as C++, make sure you make everything an object in the project, as it will ensure a very good understanding of how OOP (Object Oriented Programming) works. Once you get familiar with OOP and comfortable working with it, you will not be wanting to go back to procedural programming — and then you can call yourself an intermediate programmer.

  • Hello World — Printing a string to the console.
  • Guessing Game (eg. guess a number) — Generate a random number, have the player try to guess the number.
  • Tic-Tac-Toe — Slightly more complicated game, will challenge you on several aspects of basic programming.
  • Pong — Very simple game, but requires animation, which can be quite difficult at first. Will get you familiar with time-based programming, real-time input interpretation and event handling.

Anytime you feel like you don’t know exactly how to solve a problem, write it out in pseudo-code, as such:

create keyboardInputVariable
generate aRandomNumber

while keyboardInputVariable does not equal aRandomNumber
     ask user for input
     set keyboardInputVariable equal to keyboardInput

// once outside this loop, the number has been guessed
print game-over string

By writing out pseudo-code, things become much easier to solve, as you have the solution in —almost— plain english.

I hope this helped you get started on your first projects. If i neglected to mention something, that you as a beginner, would like to know on the subject of getting started, let me know by commenting and I’ll update the post accordingly.

Count in Binary

Posted: September 10, 2010 in Tips & Tricks
Tags: ,

I felt like doing a quick post on something this evening, and so tonight I’ll be teaching you how to count in binary. Regardless of whether or not you are a programmer, being able to count in binary is quite fun.

What is Binary?
Binary refers to a system consisting of two components, and in the realm of computing we recognize these two as ones and zeroes.

1 .. 2 .. 4 ?
Counting in binary is quite simple. Consider a block of zeroes, say 8 (eg. 00000000), each of these numbers are called bits, and 8 bits make up one byte.

0	00000000
1	00000001
2	00000010
4	00000100

Notice the pattern here, that each time you move the 1 one over toward the left, you increase the value by a factor of 2 (multiplication by 2). So, 8 would be 00001000.

Where did 3, 5, 6 and 7 go ?

0	00000000
1	00000001
2	00000010
3	00000011
4	00000100
5	00000101
6	00000110
7	00000111
8	00001000

Notice that on each pass of multiplication by 2 (1, 2, 4, 8, 16), we fill the gap of zeroes behind it in a pattern similar to how we did the multiplication. The only difference is that we are counting on top of it. If you look away from the bit that make up the number 8 (fifth bit from the left), you are just counting 1, 2, 3, etc. all over again — this is illustrated below.

8	00001000
9	00001001
10	00001010
11	00001011
12	00001100
13	00001101
14	00001110
15	00001111
16	00010000

There is also a visual pattern going on here, if you look at each column of the numbers 0 through 8, look at the rightmost column, and you will see the alternating pattern of even and odd numbers (0 is even, while 1 is an odd number). The same pattern emerges when you look at the next column, which alternates in a pattern of 2/2 (2 zeroes, 2 ones, etc.). As you may have guessed, these patterns are found all throughout the columns, as the next column will then be 4/4 — this makes a nice rule of thumb to remember binary counting by, you can also immediately tell whether or not it is an odd or even number, just by looking at the rightmost column.

If this still doesn’t make a whole lot of sense, try adding two binary numbers together, as shown below (overly simplified, for illustrating the correlation).

8 + 2 = 10	00001000 + 00000010 = 00001010
16 + 5 = 21	00010000 + 00000101 = 00010101

Hopefully this was understandable. It is quite easy to count in binary, once you know the pattern. With 8 bits (one byte), you can count from 0 to 255, of course you can always extend the range to 16, 32 or even more bits if you wish. Knock yourselves out, have fun.

I bet you have been wanting to put your own custom ringtones on your iPhone, free of charge, for quite a while — I have a solution for you.

Ever since I got my first iPhone, I have found the lack of easy custom ringtones to be quite a pain. Apple will tell you to use iTunes if you wish to rip a piece of a song and use that as your ringtone, however they will charge a small fee for that and only a select few of the iTunes store songs are eligible for ringtone creation — in other words, their solution is not very handy, at all.

The Solution
It is actually quite simple and I don’t really know why I only just found out about this, but it seems GarageBand does the trick for us and you are not constricted to use song rips with this approach.

Open up GarageBand and create a new project, set the loop bar to 40 seconds or lower (this is the time limit of ringtones on the iPhone). Over the span of your loop, start creating your very own ringtone, and when you are happy with your marvelous creation go to the menu ‘Share’ and click on ‘Send Ringtone to iTunes’. Sync your iPhone and voila!